First steps
Helm looks after WordPress installations that do not share a server and often do not share an owner. It connects to each one through a small plugin — the connector — and from that moment updates, backups, security and availability are watched and driven from a single place. Getting to your first monitored site takes four steps, in this order.
Signing up creates an organisation: the container for your sites, the people who work on them and your plan. If you work for several clients you do not need separate accounts — all the sites live here and permissions decide who sees what. The free plan includes five sites, forever, with no credit card.
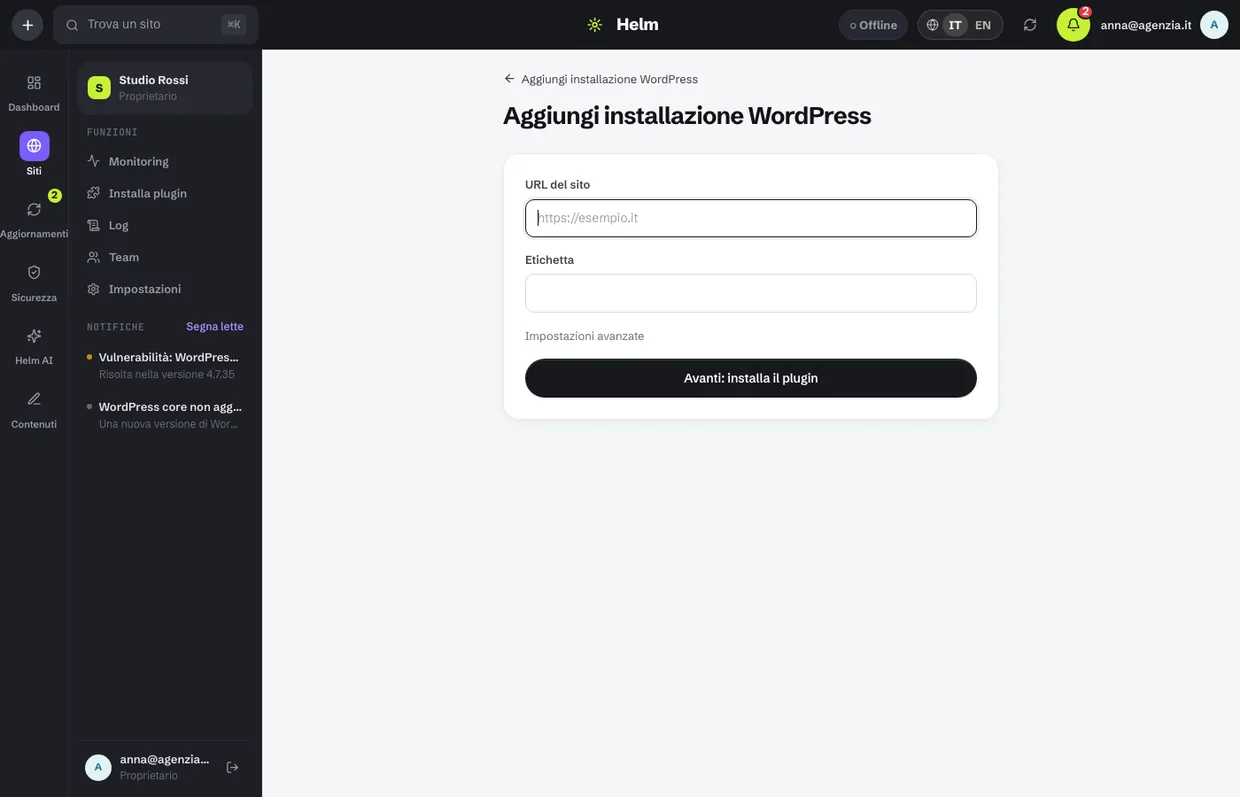
Go to Sites → Add WordPress installation and enter the address. Helm generates a connection key: it is the one-time password the plugin uses to introduce itself to the panel, and it goes into the connector on the site. The label is the name you will see in the list, so the client's name is usually the right choice.
As soon as the connector answers, Helm reads the WordPress version, plugins, themes, users, storage and security state. It takes seconds, and the site turns “Connected”. From then on that read repeats by itself several times a day, and the availability check starts immediately.
Settings → Notifications: choose email and Telegram, category by category. This is the step most people skip, and without it a site can stay down all night with the alert sitting in the panel's bell icon — which nobody looks at at three in the morning.
Connecting a site
The connector is a WordPress plugin that talks only to Helm. Every request is signed with the connection key, so nobody else can drive it, and the site's own login credentials — WordPress username and password — never pass through here and are never asked for. The plugin stays yours: if one day you stop using Helm, you uninstall it and the site does not notice.
How to install it
- In Helm, open Sites → Add WordPress installation and write the full address (with https://). The label fills itself in with the domain: change it only if you prefer another name.
- Download the plugin from the same screen. Alternatively install it from wp-admin → Plugins → Add new → Upload plugin, as you would with any other .zip.
- Activate the plugin on the site. A Helm entry appears in the WordPress menu.
- Paste the connection key into the plugin's settings page and save.
- Do not close the page: it lights up on its own as soon as the connector gets in touch, and tells you what it read — WordPress version and number of plugins. If you closed the tab before pasting the key, you can generate a new one from the same page: the old one stops working.
Site states, and what they mean
- Waiting — the key was generated but the plugin has not been in touch yet. It is almost always one of two things: the key pasted half way (it is long, use the copy button) or a site that cannot be reached from the internet — local, behind a VPN or password-protected.
- Connected — all good: Helm reads the site's state and, when you ask it to, writes to it (updates, backups, fixes).
- Disconnected — the site has not answered for a while. Helm keeps retrying on its own, with nothing needed from you: when it becomes reachable again it reconnects.
- Error — the plugin answers but something is wrong: invalid key, filesystem permissions, a PHP version that is too old. The exact message is on the site card.
If the site changes domain, update its address from the site card: Helm keeps checking the one it knows, and an old address that no longer answers would be mistaken for an outage.
The dashboard
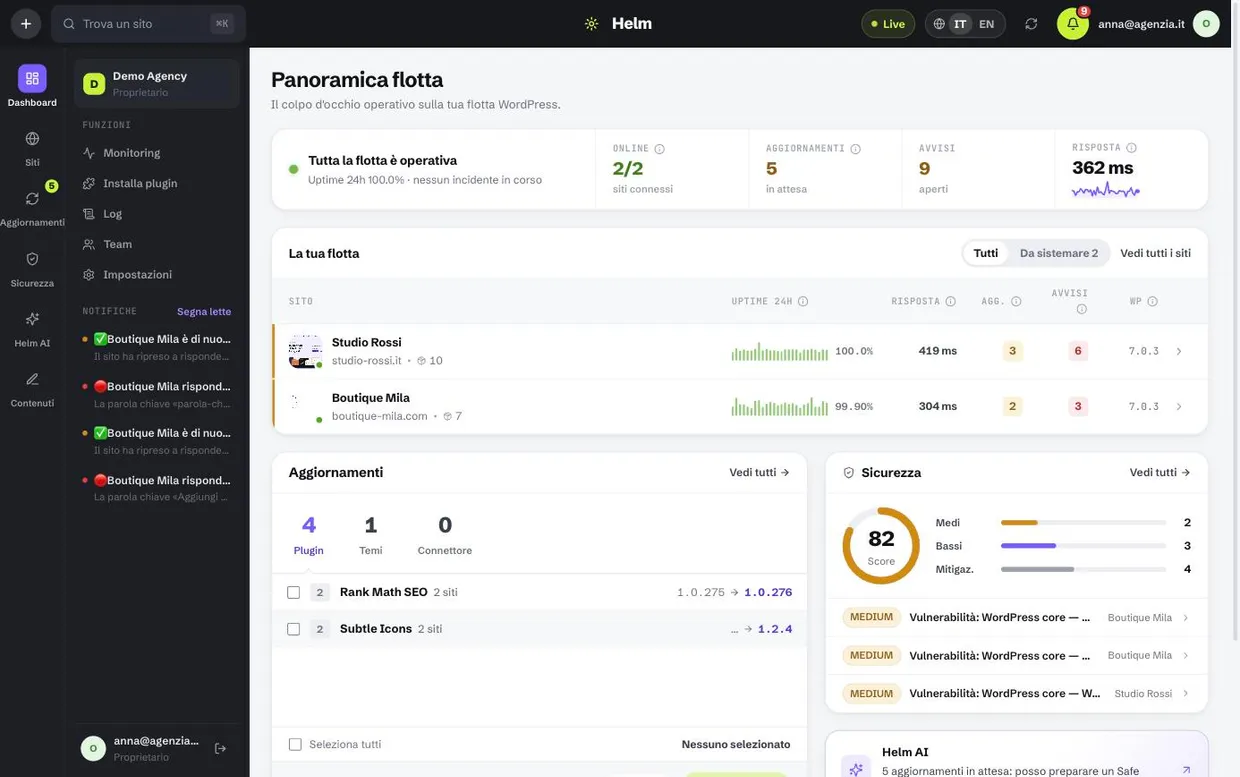
The first screen answers two questions, in the order you ask them in the morning: is something wrong? and what do I need to do? At the top a one-line verdict, right below it the «To do» queue with everything that needs attention, then the fleet site by site. Every piece of information appears once, in the right place.
- The title at the top is the verdict: «The whole fleet is operational» or «2 sites need attention», with the average uptime of the last 24 hours below. If it says all is well, you can close the page.
- «To do today» is a timeline in chapters — Outages, Security, Updates, Operations — with everything that needs a decision. Updates are ticked and launched right there with «Safe Update», without changing page.
- An update that fixes a security flaw is ONE row, not two: the queue marks it with «fixes a critical flaw» and puts it on top. Updating that plugin is closing that alert.
- On the right, the fleet as a list of compact cards: site preview, status in one sentence («Operational · 100% · 412 ms · 2 updates»), and the small curve of recent response times. Sites with something pending sit on top.
- If there is nothing to do, the timeline says so in a single line: the absence is the information. Failed operations appear as an «Operations» chapter only when there are any; the full history lives in the activity log.
Sites and the site card
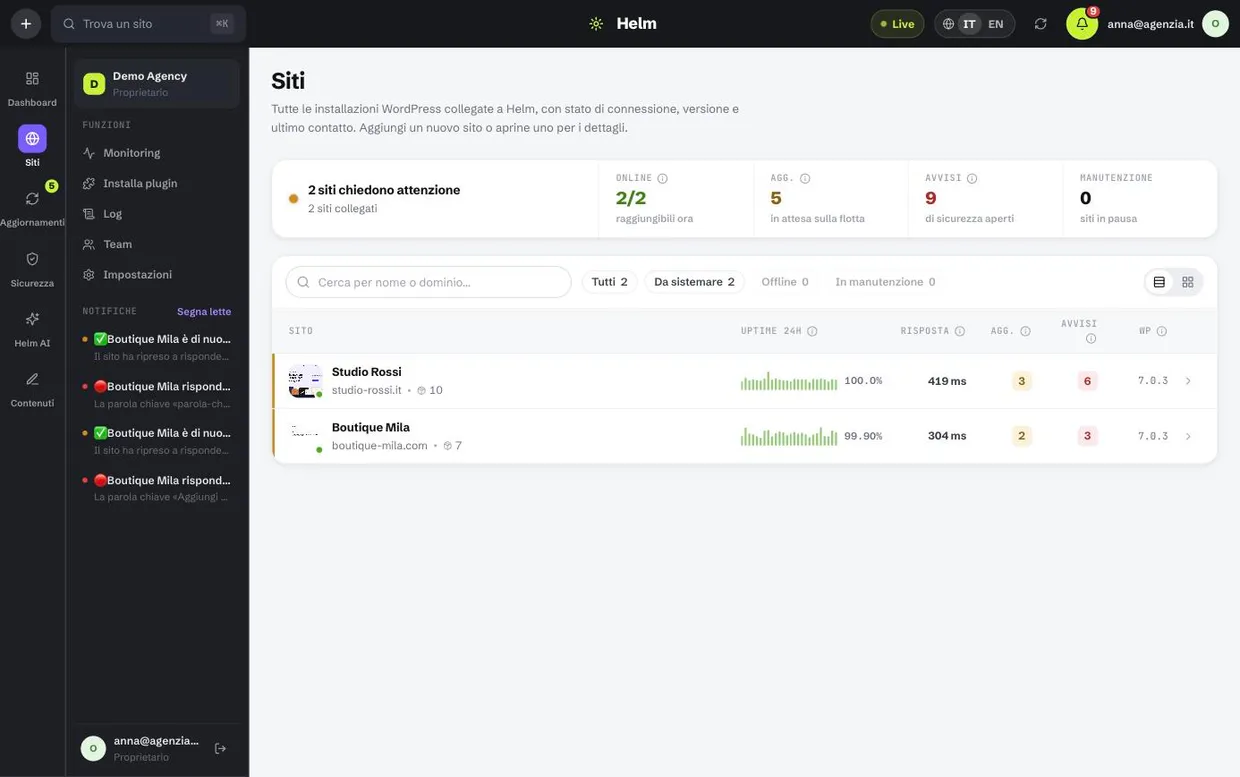
The site list is the working view: who is online, how long they take to answer, how many updates and alerts they have, which WordPress version they run. From here you search by name or domain, filter by state, or switch to the card view if you prefer thumbnails. Opening a site takes you into its card, split by subject.
The site tabs
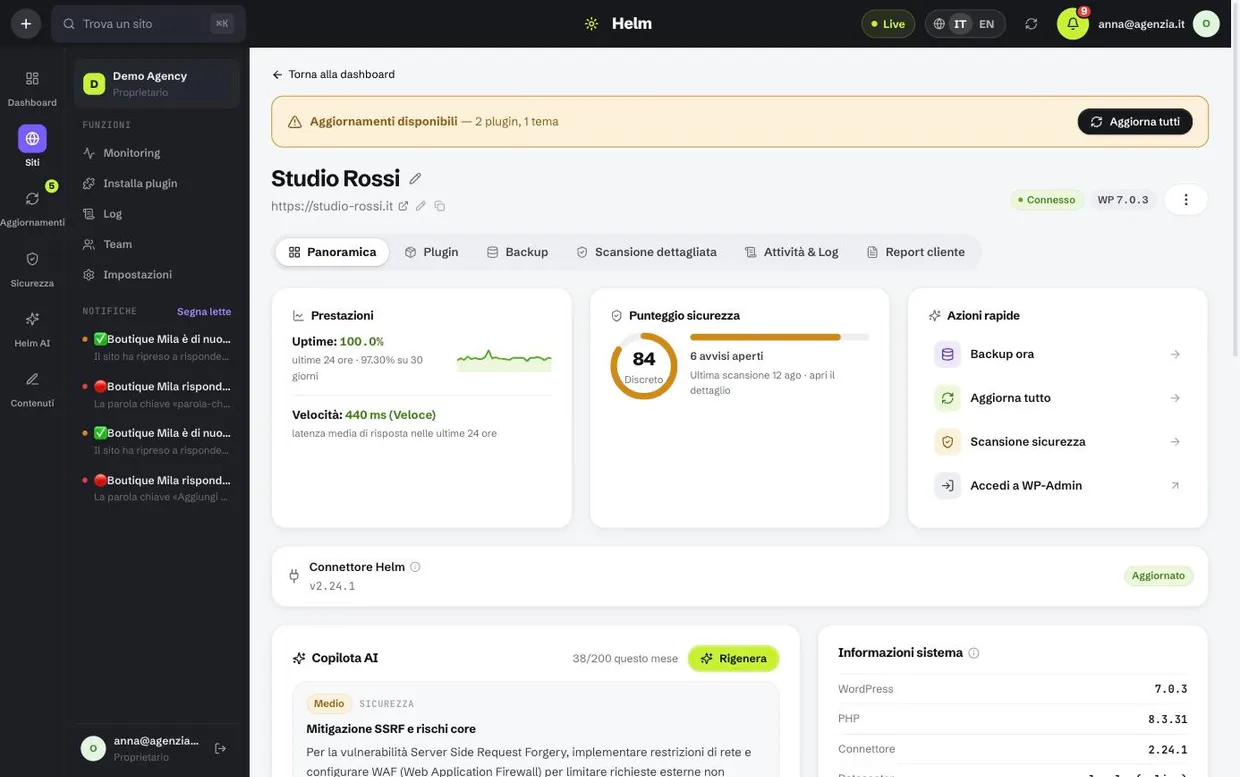
- Overview — the site's «To do» queue (updates to launch with Safe Update, flaws to close, connector, broken links), then availability and speed, the security score and, at the bottom, the technical sheet: contents, WordPress, PHP and connector versions.
- Plugins — the full list with installed version, available version and state. From here you update, activate, deactivate, delete and switch on auto-update for a single plugin.
- Backups — available copies with date and size, download and restore, plus the automatic schedule.
- Detailed scan — the security checks one by one, with their outcome and an explanation of what was verified.
- Activity & Log — everything that happened on this site, including changes made by someone else straight in wp-admin.
- Client report — the period summary to send to whoever pays, with its public link.
What you can do from here
- Open WP-Admin in one click, with no shared passwords: Helm opens a one-time session valid for 60 seconds. It is the right way to give a collaborator temporary access without creating them a user.
- Put the site in maintenance with a message you write. While it is in maintenance the checks continue but stay out of the statistics, so planned work does not eat into the month's availability.
- From the “…” menu at the top right of the header: rename the site, fix its address, download a fresh copy of the connector or update it remotely.
- Remove the site from the fleet when the relationship ends: the plugin stays installed but stops answering, and the history leaves your panel.
Monitoring and availability
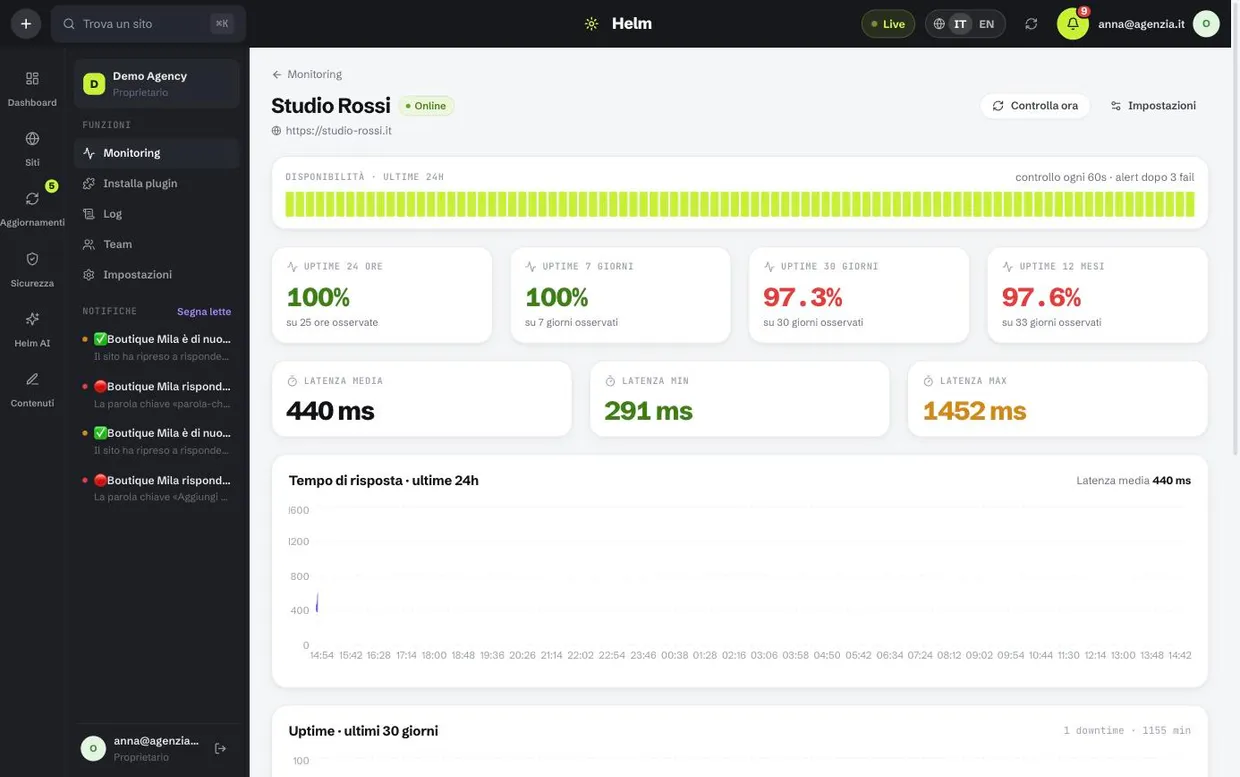
The check is external: Helm calls the site from outside, the way any visitor would, without going through the connector. That is the difference that matters, because when WordPress goes down the plugin stops answering — and monitoring that relies on the plugin goes quiet exactly then. Here the check carries on and turns into an alert.
How to set up monitoring for a site
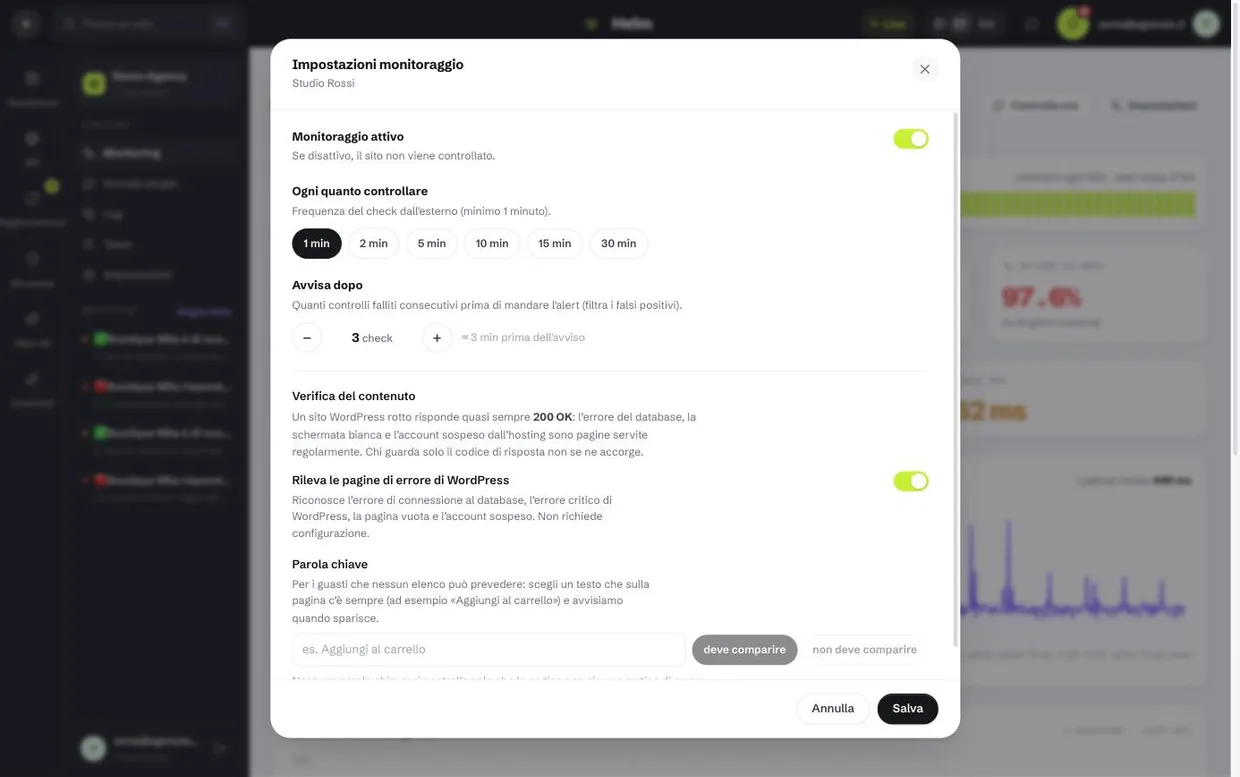
- Open Monitoring and pick the site, or go to its card: “Settings” is at the top right.
- Choose how often to check it. One minute for sites that sell, five or ten for brochure sites: checking more often does not make them more reliable, it only shortens the gap between the failure and the alert. The free plan starts at five minutes — tighter intervals stay visible but switched off, and the choice you made becomes valid again if you change plan.
- Set how many consecutive failed checks should raise the alarm. With three and a one-minute interval, a site has to be unreachable for three minutes before anyone is woken up: that is the filter that keeps network hiccups out.
- Leave WordPress error page detection on, and if the site has something that MUST be there — an “Add to cart” button, a phone number, a product name — put it in the keyword field.
- Further down, «Post-update check»: if after an update one page matters more than any other — the cart, the members' area — put it in «Page to verify», and beside it the text that is always there («Proceed to payment»). A broken page often still answers «all fine» but without its content: that text is the only way to notice from outside. If it fails, the update is rolled back.
- Save. From then on the first check runs within a minute; «Check now» forces it immediately so you can see the outcome.
What it checks
- That the site answers, and how fast: an interval from 1 to 30 minutes, chosen per site. The minimum depends on your plan: five minutes on the free one, one minute on the paid ones.
- The confirmation threshold, that is how many consecutive failed checks are needed before declaring an outage. The usual value is three.
- The content of the page, not just the response code: it recognises the database connection error, the WordPress critical error, the blank page and an account suspended by the host. In all of those the server answers “200 OK” and ordinary monitoring reports everything as fine.
- A keyword of your choice that must appear on the page (or must not). It covers the failures no list can predict: a vanished cart, a broken contact form, a replaced homepage.
- HTTPS certificate and domain expiry, with staged warnings at 30, 14, 7, 3 and 1 day — and two months ahead for the domain, because renewing one can involve steps that do not fit into an afternoon.
How to read the numbers
- Availability is measured over TIME, not over how many checks succeeded: under every percentage you get how much time we actually observed. “100% over 3 observed hours” and “100% over 30 days” are different things, and they should look different.
- Four windows: 24 hours, 7 days, 30 days and 12 months. The 12-month one is the number that ends up in contracts.
- Minimum, average and maximum response time over the last 24 hours, plus the chart: it is how you notice a site slowing down before it stops altogether.
- The outage list, with the cause in plain language (“the keyword disappeared from the page”) and the raw technical error underneath — the one to paste into a ticket for the host.
- “Check now” forces an immediate check without waiting for the next round: useful right after fixing something, to see whether it is back.
Performance, measured by Google
- The score is the PageSpeed Insights one, the same your client sees if they look it up themselves. We do not compute our own: a number of ours saying “good” where Google says 43 would be useless.
- It is measured once a week, on the mobile version — the one Google ranks on. More often would make no sense: the score moves when someone touches the theme, the plugins or the images, not from one day to the next.
- Next to the score is the change since the previous measurement: it is the line you use to show a client that the work paid off. It is missing on the first measurement, because there is nothing to compare yet.
- The three metrics below say WHERE the time goes: LCP is when the main content appears (usually an oversized image), CLS is how much the page jumps while loading, TBT is how long it ignores clicks because of scripts.
- The dot next to each metric uses Google’s thresholds: green, amber or red. The first measurement arrives within a few days of connecting the site, not immediately.
- Below the metrics there is “What to do to go faster”: the items come from Google with the estimated saving next to them — “compress the images · −2.4 s” — ordered by what pays off most. The score says there is a problem, this list says where to start.
- The AI copilot reads the same measurements and cross-checks them with the plugins you have installed, which Google’s report cannot do: “your LCP is 4.2 s and 60% of the weight is images — you have Elementor without an image optimisation plugin”. It does not cost an extra analysis: it travels inside the one you already ask for.
Planned maintenance does not pollute the statistics. While a site is in maintenance the checks are recorded but stay out of the availability calculation and raise no alerts: two hours of announced work does not cost you 0.3% of the month.
Updates
One screen for core, plugins and themes across the whole fleet. The gain is not only the time saved: updating the same plugin on ten sites in one operation means that if a release is broken you find out once and know it for all of them, instead of finding out ten times on ten different days.
How to update in bulk
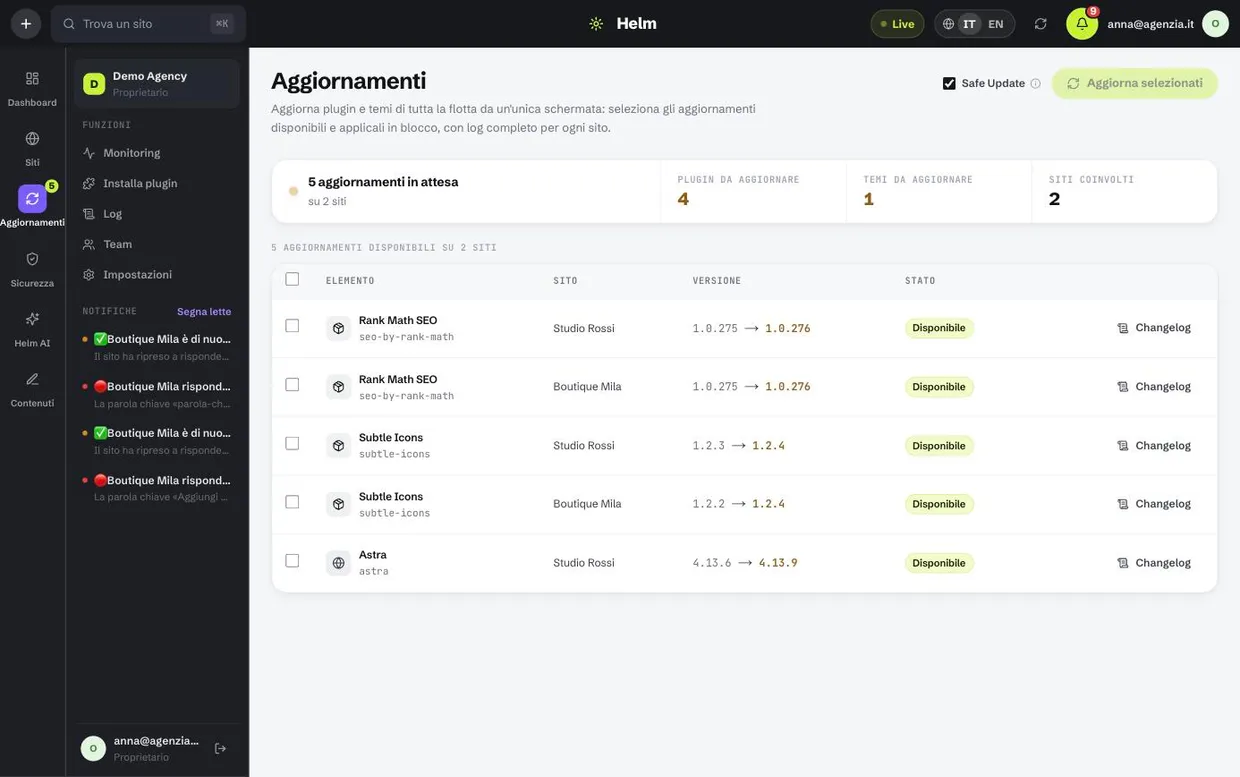
- Open Updates: the list shows every available update with its site, the current version and the new one.
- If a version is unfamiliar, open the changelog from its row: you read it there, without hunting for it on wordpress.org.
- Tick the rows you want to update. You can select the same plugin across several sites in one go.
- Check that “Safe Update” is on: it is the switch that takes a database backup before anything is touched.
- Press “Update selected” and let it work. When it finishes each row carries its outcome, and the activity log keeps the record.
What happens if something breaks
- Before updating, with “Safe Update” on, a copy of the site's database is saved.
- After the update Helm calls the site back to verify that it still responds and is not showing a critical error. It checks the homepage and, if you named one in «Page to verify», that one too: that is where the failures a homepage hides show up.
- If the site no longer answers, plugins and themes are rolled back to the previous version automatically, without waiting for you to notice.
- Either way you get an alert with what was updated, what failed and what was rolled back.
- Auto-update can be switched on plugin by plugin from the site card: handy for security plugins, best avoided for anything that touches the layout.
Updates made outside Helm
- The «Update» button in wp-admin is one click away, and WordPress auto-updates ask nobody's permission. Helm sees them anyway: the connector reports the moment it happens, not at the next scan.
- In the log you find what changed, from which version to which, and from where: the WordPress panel, an automatic update, or the command line. If it was a site user, who it was as well.
- Right afterwards Helm checks that the site still responds, using the same pages as a safe update. If it broke you get a high-severity alert naming the component that was touched.
- Helm never rolls anything back on its own. An update you did not ask for may have been wanted by somebody else — the client, a colleague — and undoing it behind their back would be worse than the fault.
- For 48 hours the site page shows a banner with «Roll back»: you press it, after reading what would revert and to which version.
- It rolls back the code, not the data: if a plugin changed the database while updating, those changes stay. To roll back the data too you restore a backup.
- If a plugin kills WordPress outright — fatal error, blank page — the site can no longer speak, but a small watchman installed alongside the connector can: it survives the failure and tells you which file caused it. It only reports; it never deactivates anything by itself.
Plugins across sites
Find a plugin and install it on ten sites in a single operation, or upload a zip of your own — a paid plugin you hold a multi-site licence for, for instance.
How to install across several sites
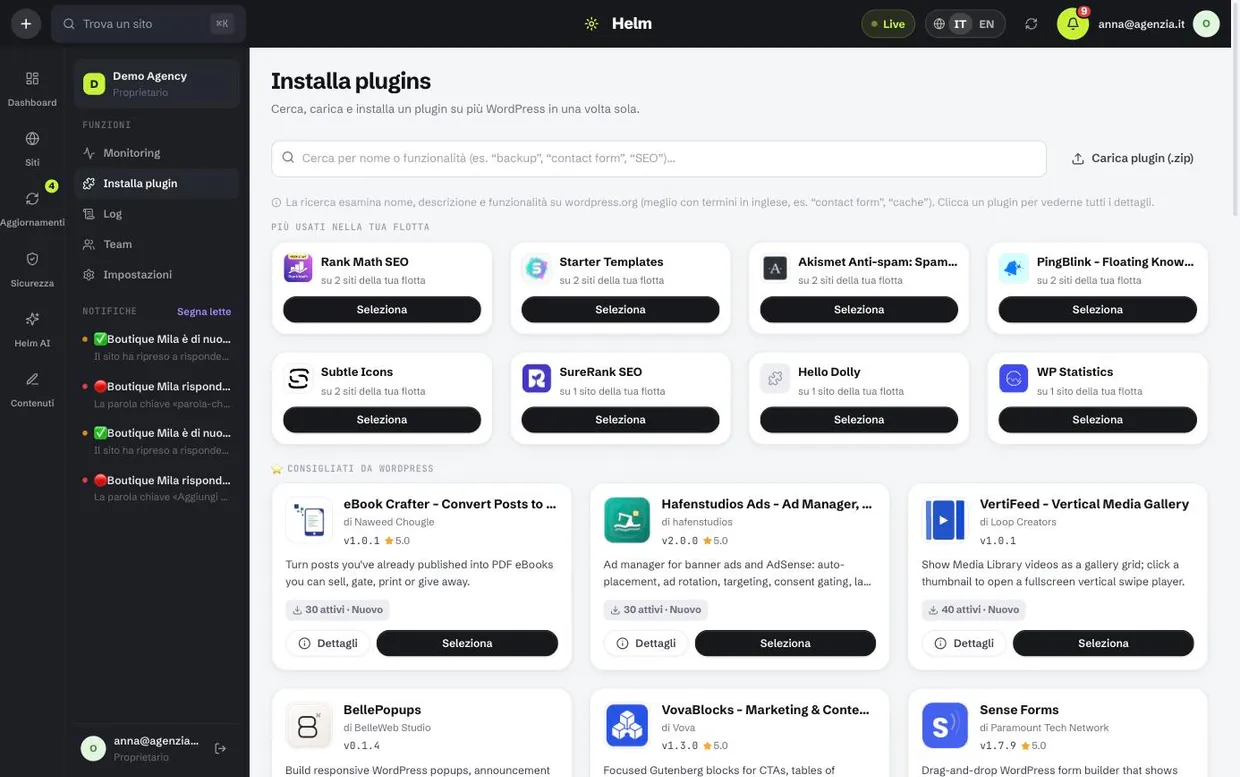
- Open Install plugins and search by name or by what it does. The search queries wordpress.org and works better in English: “contact form” finds more than its translation.
- Open the details if you want to check rating, active installations and the date of the last update — a plugin untouched for two years is a risk, not a saving.
- Press “Select” and choose which sites to install it on.
- Confirm: Helm installs on every chosen site and shows the outcome row by row. Sites that already had it are skipped.
Worth knowing
- “Most used in your fleet” shows what you already have elsewhere: it is how you avoid ending up with two plugins doing the same job on different sites.
- A paid plugin is uploaded as a .zip and installed where needed, exactly like the ones from the catalogue.
- Installing does not activate the plugin by default: you activate it from the site card when you are ready.
- Activation, deactivation and deletion happen on the individual site card, in the Plugins tab.
Security
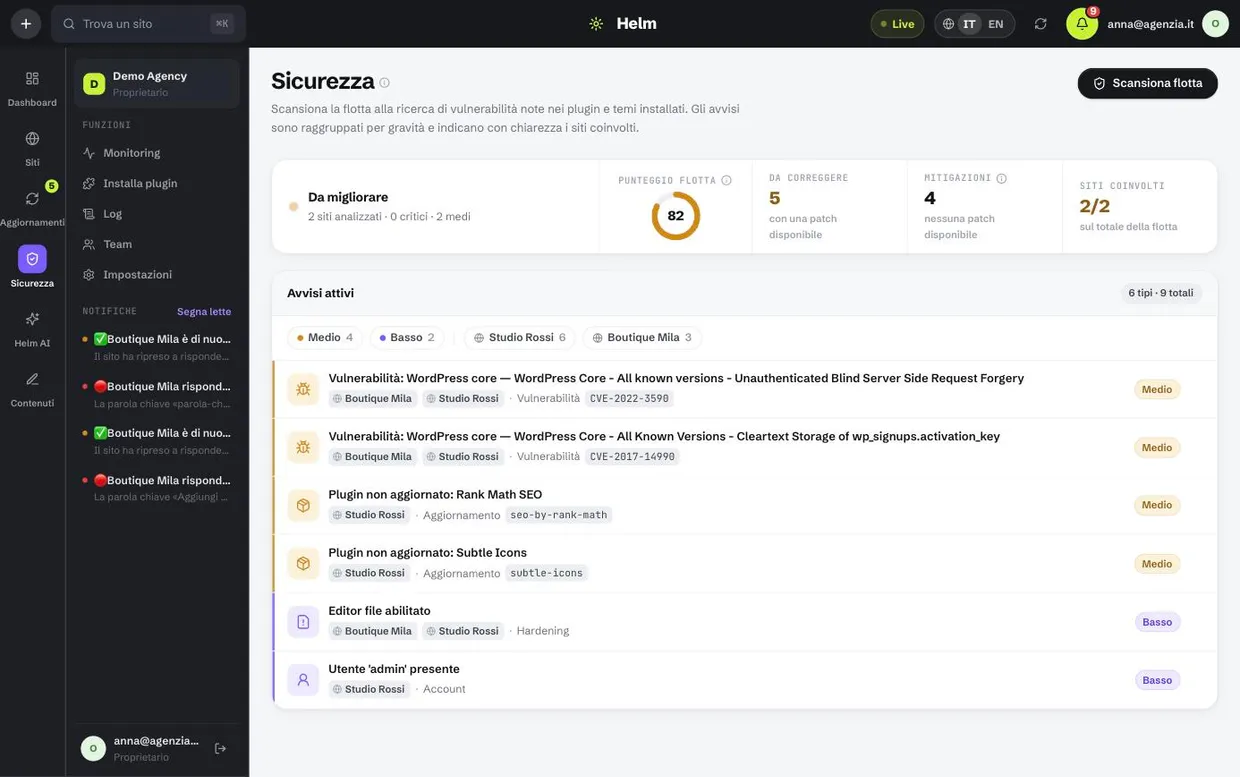
We do not invent vulnerabilities: they come from the Wordfence Intelligence feed, the public record of known flaws in WordPress plugins and themes, with the CVE code and the version that fixes them. On top of that come configuration checks — the things left open on a site out of inattention.
How to close an alert
- Open Security: alerts are grouped by severity and each row says which sites are affected.
- Click the alert to read the plain-language explanation — what can actually happen — and the remediation steps in priority order.
- If Helm can apply a fix, the button runs it on the site. It only starts after your confirmation, never on its own.
- If the alert does not apply to you (it happens: a generic check against a site with particular needs), press “Ignore”. The rule sticks and the alert does not return at the next scan.
- Run the scan again to verify: the score updates and the alert leaves the list.
What you see
- A score from 0 to 100 for every site and a fleet average: it is there to tell you where to start, not to boast about.
- Known vulnerabilities with their CVE code, severity and the version that fixes them — which almost always means: update that plugin.
- Configuration checks: the file editor in the dashboard, a user called “admin”, exposed XML-RPC, missing HTTP security headers, WordPress and PHP versions visible from outside.
- The site's WordPress users: who they are, their role, when they last signed in. From here you block the ones no longer needed.
- A scan can be launched by hand on one site or on the whole fleet, and runs by itself at regular intervals anyway.
Broken links
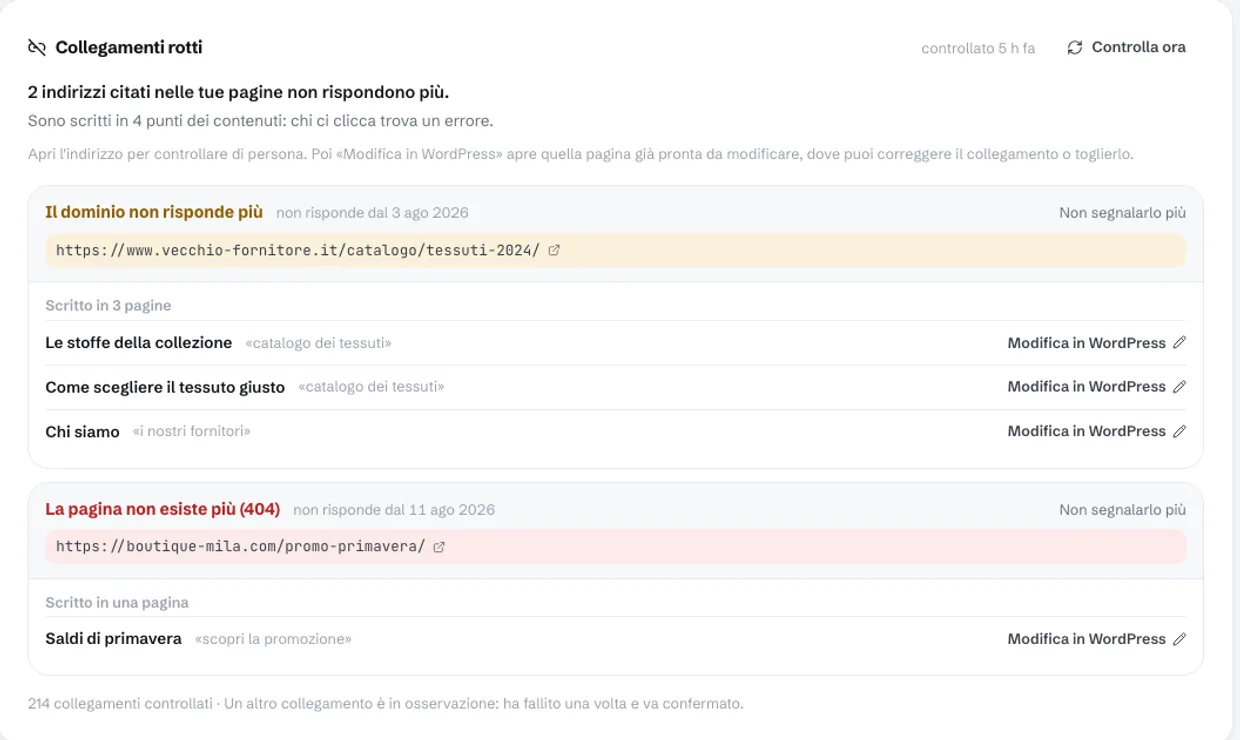
An address written into a page can die without anyone noticing: the site you linked to closes, changes structure, moves an article. The link stays there, and anyone clicking it gets an error. Helm reads your published content, tries every address from the outside and tells you which ones no longer respond.
How to read it and fix it
- The check starts off on every site: open the site, go to the «Links» tab and turn on the «Check enabled» switch. The first pass starts straight away.
- Each box is one address that no longer responds: at the top you get the reason — «the domain no longer responds», «the page no longer exists» — and the address itself, clickable, so you can see for yourself.
- Below are the pages where that address is written, with the clickable text in quotes: that is how you find it inside the article.
- «Edit in WordPress» opens that page ready to edit, with no password. Fix the address or remove the link, and save.
- At the next check the entry disappears on its own. If you are in a hurry, «Check now» runs the pass immediately.
- If you no longer need it, turn the same switch off: from then on Helm sends no requests to those addresses.
What the system decides
- The pass runs daily and looks only at published content, up to 400 links per site.
- Entries are grouped by address, not by page: the same dead address written in four places is one problem with four fixes, not four problems.
- A 404 is reported straight away, because the server itself says the page is gone. A network error or a 500 must repeat for three passes before it shows up: servers hiccup, and a list that cries wolf stops being read.
- A 401, a 403 or a 429 is not a broken link: the page exists and is turning robots away. We don't report those.
- Links that failed once or twice are counted at the bottom as «under watch»: we are keeping an eye on them, but we don't call them broken yet.
- «Stop reporting it» applies to the whole address and deletes nothing: it stays in the counts, it leaves the list of open problems.
- When there are broken links the site overview says so with a notice, and the number of addresses appears on the «Links» tab: you don't have to open it to find out.
- The check is switched on per site, not per organisation: you can keep it on for three sites and off for the rest, and sites that are off are not queried at all.
Backup and restore
Database and files, from the panel, without touching FTP or the host's control panel. A backup serves two very different purposes: going back when something breaks, and taking a copy away when a client changes provider. Helm does both.
How to restore a backup
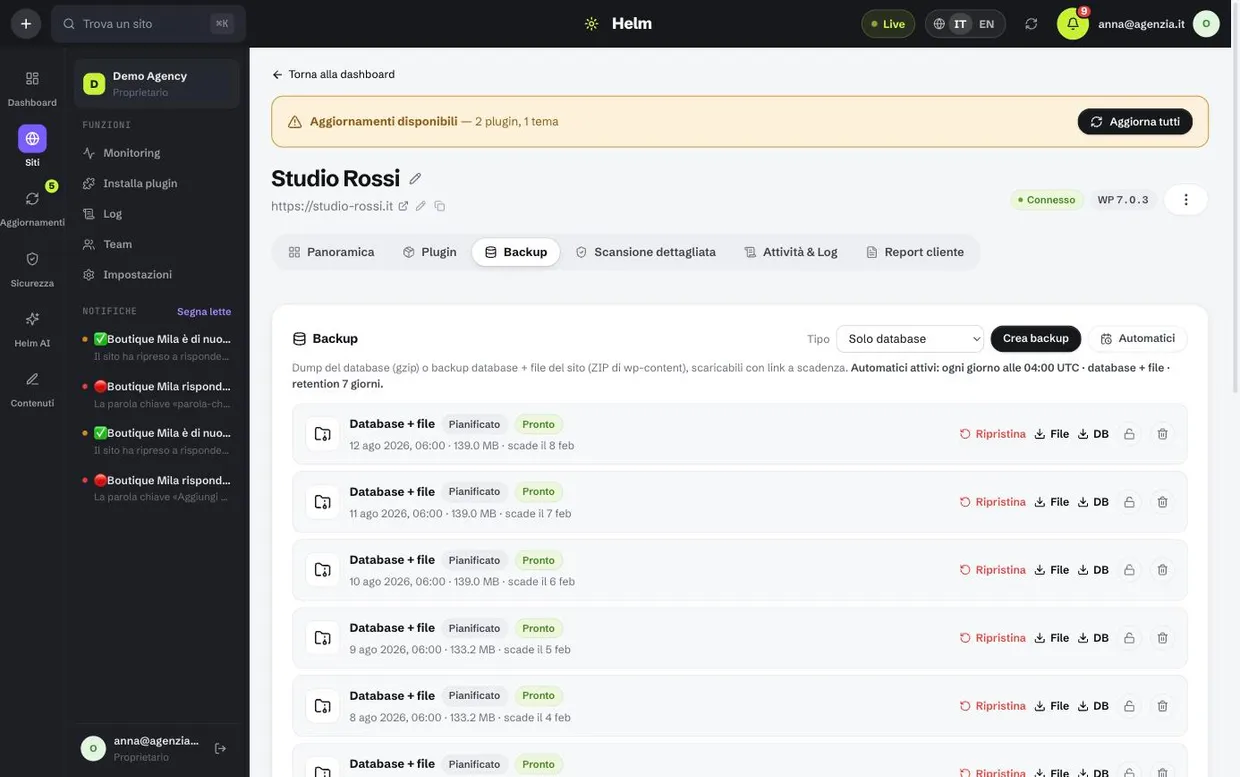
- Open the site card and go to Backups: the copies are listed by date, with type, size and expiry day.
- Pick the copy to put back. When in doubt take the last one before the problem, not the most recent one.
- Press “Restore” and confirm. The restore happens in chunks, so even an archive of hundreds of megabytes does not time out halfway.
- Wait for the operation to finish before taking the site out of maintenance: at the end Helm checks that the site answers again.
How backups work
- “Database only” is a compressed dump: light, fast, and it holds content and settings. “Database + files” adds a zip of wp-content, so themes, plugins and media.
- Scheduled backups are set per site: how many hours apart, at what time, and for how many days to keep them.
- Before every bulk update a safety copy is taken, if “Safe Update” is on: that is what makes the automatic rollback possible.
- Downloads go through an expiring link: you can send it to an outside developer without giving them panel access.
- Storage is the one in your plan and is always visible at the bottom of the page.
- A manual backup starts from two places: «Backup now» in the overview's quick actions, which asks what to save, and the button in the Backup tab, where you pick the type from the menu beside it. Both offer the same choice.
- Database size is no longer a limit: the dump is written and read back in chunks, on the site and here, so shops with years of orders back up and restore like any other site.
- The file archive now also contains the site's wp-config.php, with its security keys. You need it the day you rebuild everything elsewhere — a normal restore never touches it, because overwriting a live site's configuration with a three-week-old one would take it down.
- Every night Helm re-reads each site's copies and checks that they are intact: the database dump line by line, the file archive from its internal index, and — for copies that build on a previous one — that every link in the chain still exists. A file that arrived half-written is found now, not on the day you need it. If a copy does not hold up, you get an alert.
- Site size no longer blocks a backup: the connector works in short slices and resumes where it left off, so no single request lasts long enough for the host to cut it off. On very large sites the archive is built in several parts, applied one after another on restore.
- Not every file copy weighs the same, and that is deliberate: when the site has changed little, Helm saves only the difference from the previous copy instead of rebuilding the whole package. In the list that copy looks tiny, but it restores like any other — Helm puts the pieces back together at restore time. Every so often it starts again from a whole copy, so the chains stay short.
- If not a single file changed on a given day, no new copy appears for that day: the site diary shows a “No files changed” entry and the previous copy stays valid. It is not a missed backup, and that is why no alert reaches you.
When storage fills up, the oldest copies are removed automatically according to the retention you set — not the new ones. If a site matters more than the others, raise its retention instead of raising everyone's.
AI content
Describe the topic — or describe nothing at all. Helm writes the article, generates the images, uploads them to the media library and files the piece into WordPress. It keeps alive a blog that would otherwise sit still for months, and lets you sell that as a service without writing it by hand.
How to generate an article
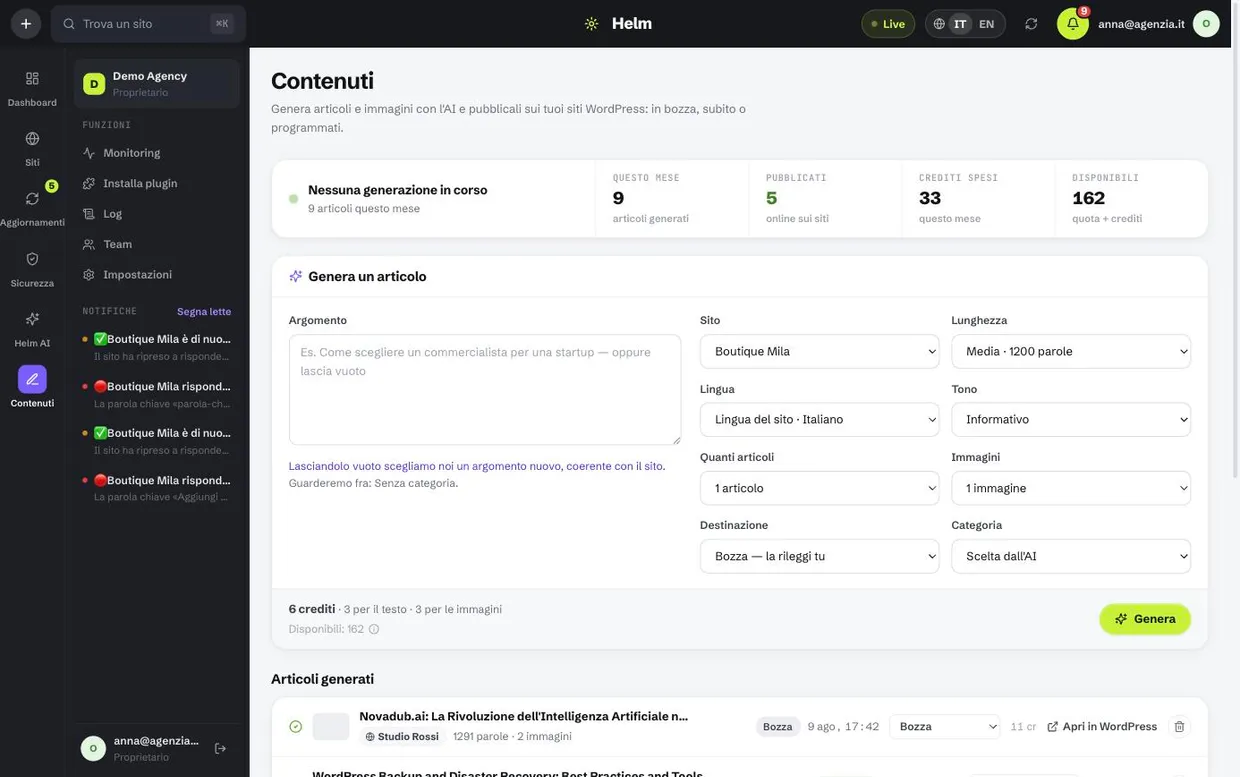
- Open Content and choose the site to publish on.
- Write the topic, or leave the field empty: in that case the AI looks at the site's categories and its published articles, and picks a new one that is not a duplicate.
- Set the four parameters: length, tone, how many images and where it should end up (draft, published now, or scheduled for a date).
- Check the credit cost written under the button, along with how many you have left. If they are not enough, the button tells you before, not after.
- Press “Generate”. The article appears in the list below and moves along by itself: writing, images, publishing. At the end you get the link to open it in WordPress.
What the AI decides, and what you decide
- You decide: site, topic (if you want one), length, tone, number of images and destination. Six fields, not twenty.
- The AI decides: title, excerpt, slug, categories, tags and the image prompts.
- The language is the site's, not the panel's: an English site gets an English article even if you use Helm in Italian.
- Images are uploaded to the site's media library like any other image, cover included: they stay yours even if you stop using Helm tomorrow.
- If something fails halfway, the credits come back. If the article was published but an image was not, the article stays and the missing image is flagged.
- The editorial plan generates N articles every X days with the parameters you chose, and stops by itself when it reaches the monthly spending cap you gave it.
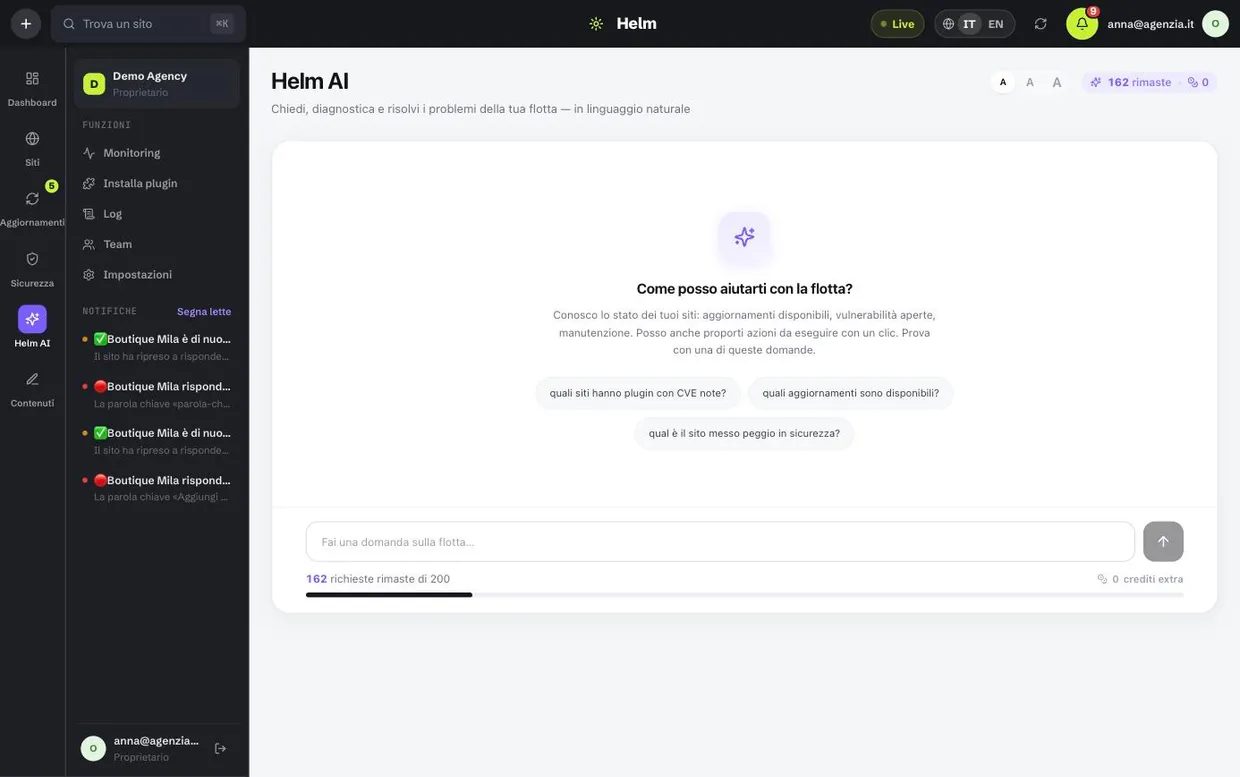
Helm AI
A question in plain language about your fleet, and an answer built on your sites' real data — not on what the model remembers about the world. It is the fastest way to answer questions that would otherwise mean opening ten tabs: which sites run plugins with known flaws, which one is in the worst shape, what changed yesterday.
- It knows site states, available updates, open vulnerabilities, backups and ongoing maintenance.
- Beyond answering, it can propose actions: update a plugin everywhere it is vulnerable, launch a scan, put a site into maintenance.
- Proposed actions never run by themselves: they appear as buttons and execute on one click, after your confirmation.
- Each question consumes one AI request from your plan; how many are left is written at the top, and extra credits add to the included ones.
Client report
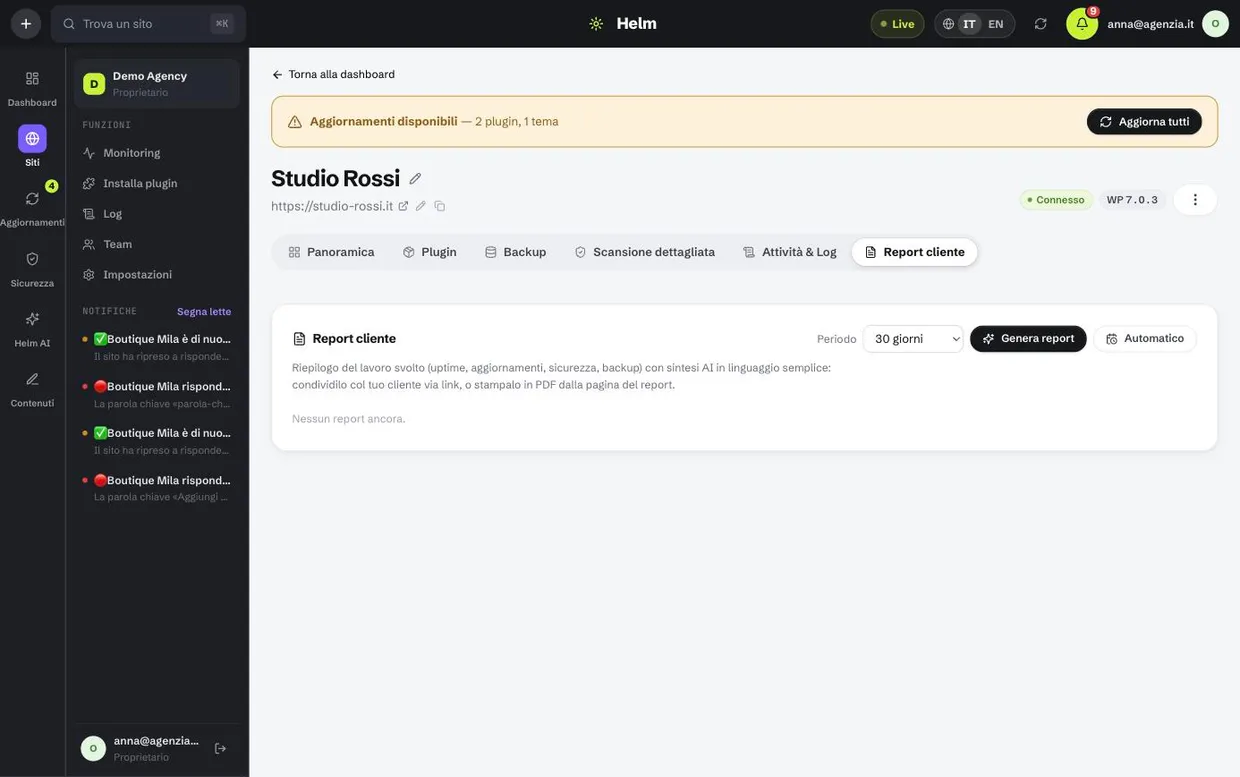
This is the document that justifies the invoice. When a client asks “what exactly do you do every month”, the answer should not be a speech: how long the site was up, which updates were applied, which vulnerabilities were closed, how many backups exist.
How to send a report to a client
- Open the site card and go to Client report.
- Choose the period — 30, 60 or 90 days — and press “Generate report”.
- Read the AI summary: it is in plain language, written for someone who does not know what a CVE is, and built on the real numbers of that period.
- Copy the public link and send it to the client, or open the report and print it to PDF if they prefer an attachment.
- If you want it repeated, switch on the automatic report: it is generated and sent every month without you remembering.
What it contains
- Availability for the period, with minutes of downtime and how many episodes there were.
- The updates applied, split between core, plugins and themes.
- Security alerts closed and still open, with their severity.
- The backups taken during the period and when the last one was.
- A written summary that ties the numbers together, so the client understands what was done without having to interpret them.
Team and permissions
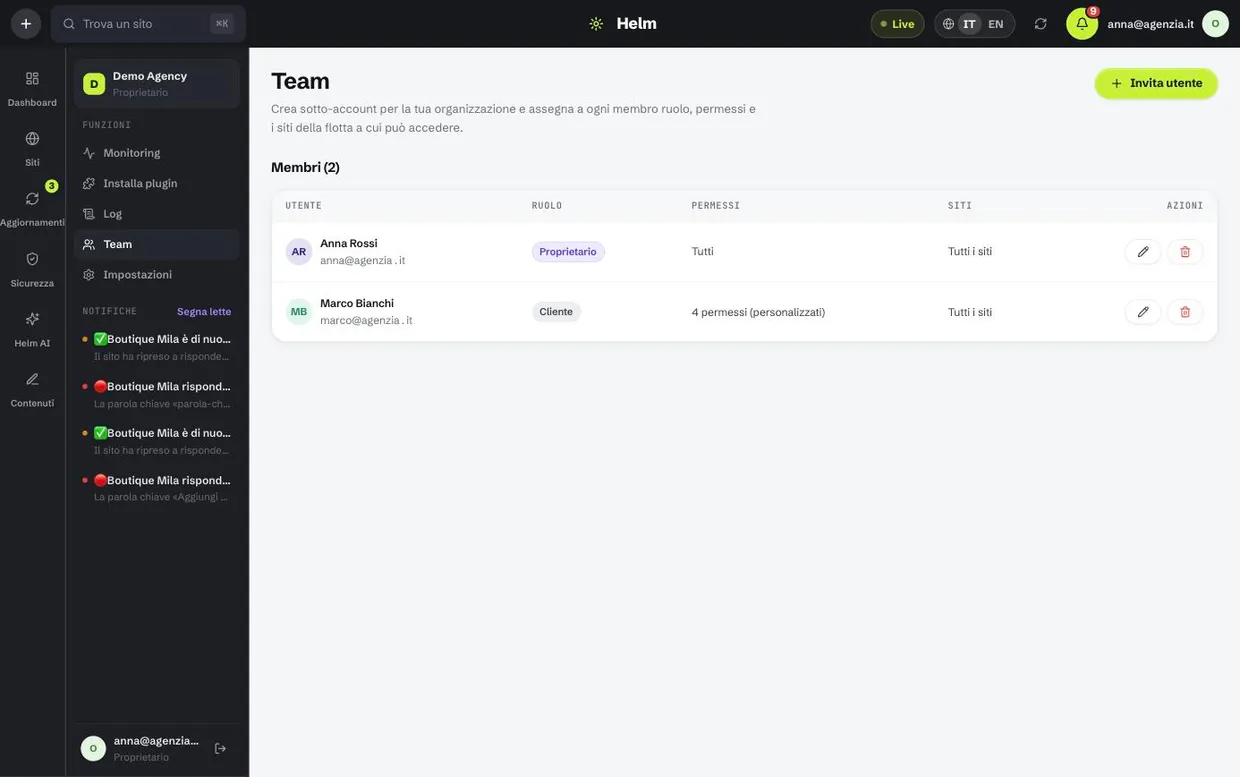
The people who work on the fleet, and the clients who only need to look at their own site. The principle is simple: nobody should be able to touch sites that are not theirs, and a client should not even know the others exist.
How to invite someone
- Open Team and press “Invite user”.
- Type the email address and choose the role: Owner, Administrator, Operator or Client.
- Adjust the permissions if you need to: roles are starting points, not cages.
- Choose which sites they get access to — all of them, or only the ones you assign.
- Send. They receive an email with an invitation that expires, and set their own password: you never see it and never have to invent one for them.
How the roles work
- Owner — can do everything, including plan, billing and removing other members. Usually there is only one.
- Administrator — manages sites, updates, security and the team, but does not touch billing.
- Operator — works on the sites assigned to them: updates, backups, resolving alerts. This is the role for whoever is in production.
- Client — read-only on their own site: state, availability and reports. They see neither the other sites nor any cost.
- If the four roles are not enough, there are twenty-five granular permissions to combine as you like.
Your brand on the documents
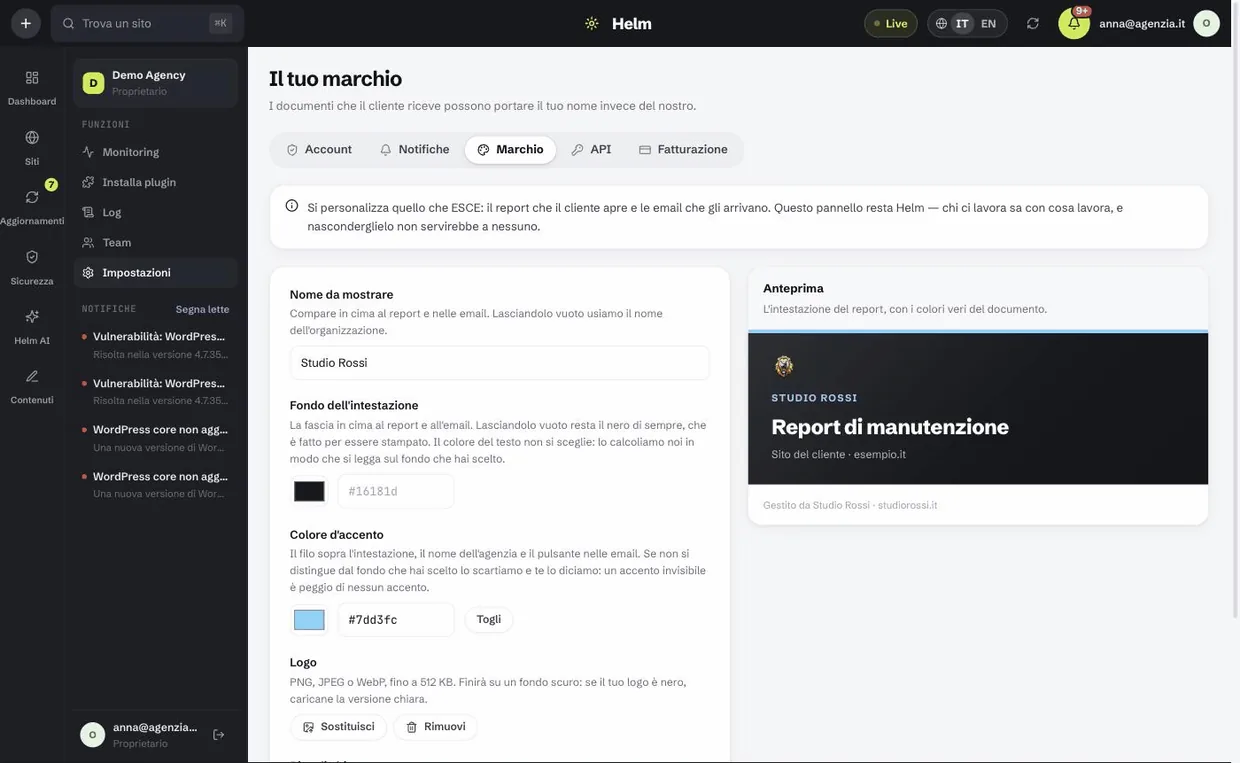
The report you send to your client and the emails they receive can carry your name, your logo and your colour instead of ours. The boundary is stated and deliberately narrow: what gets branded is what GOES OUT, not this panel — the people working in it know what they are working with, and hiding the tool from them serves nobody.
How to set it up
- Open Settings → Brand. If your plan does not include it you still see the screen, switched off, with what it would change.
- Type the display name: it is what the client reads at the top of the report. Leave it empty and we use your organisation's name.
- Upload the logo — PNG, JPEG or WebP up to 512 KB. Which version you need, the light or the dark one, the screen tells you itself based on the background you picked; the preview next to it shows how it really looks.
- Pick the header background: it is the band at the top of the report and the email. Leave it empty and it stays the usual black, which is made to be printed and filed. We do not ask you for the text colour — we work it out from the background, so on a light background the writing turns dark instead of vanishing.
- Pick the accent colour: it tints the rule above the header, your name and the button in emails. If it does not stand out against the background you picked we tell you, and use the text colour instead: an invisible accent is worse than none.
- Write the closing line — for instance “Looked after by Studio Rossi · studiorossi.it” — and save. It applies from the next report.
Where it shows, and where it does not
- It shows: header and footer of the client report, both on the public page and in the printed PDF.
- It shows: the automatic report email that reaches the client, with logo, colour and closing line.
- It does not show: the panel, the alerts that reach you and your team, Telegram notifications.
- The brand is frozen into the report when it is generated: if you change logo in November, June's report stays as it was when you sent it.
- If you drop to a plan without branding, documents go back to your organisation's name — the settings stay written and come back if you move up again.
We serve the logo ourselves, from our own address. We do not link to your site: a report lives for months in somebody's inbox, and an image that disappears leaves a broken rectangle in a document that carries your name.
Notifications
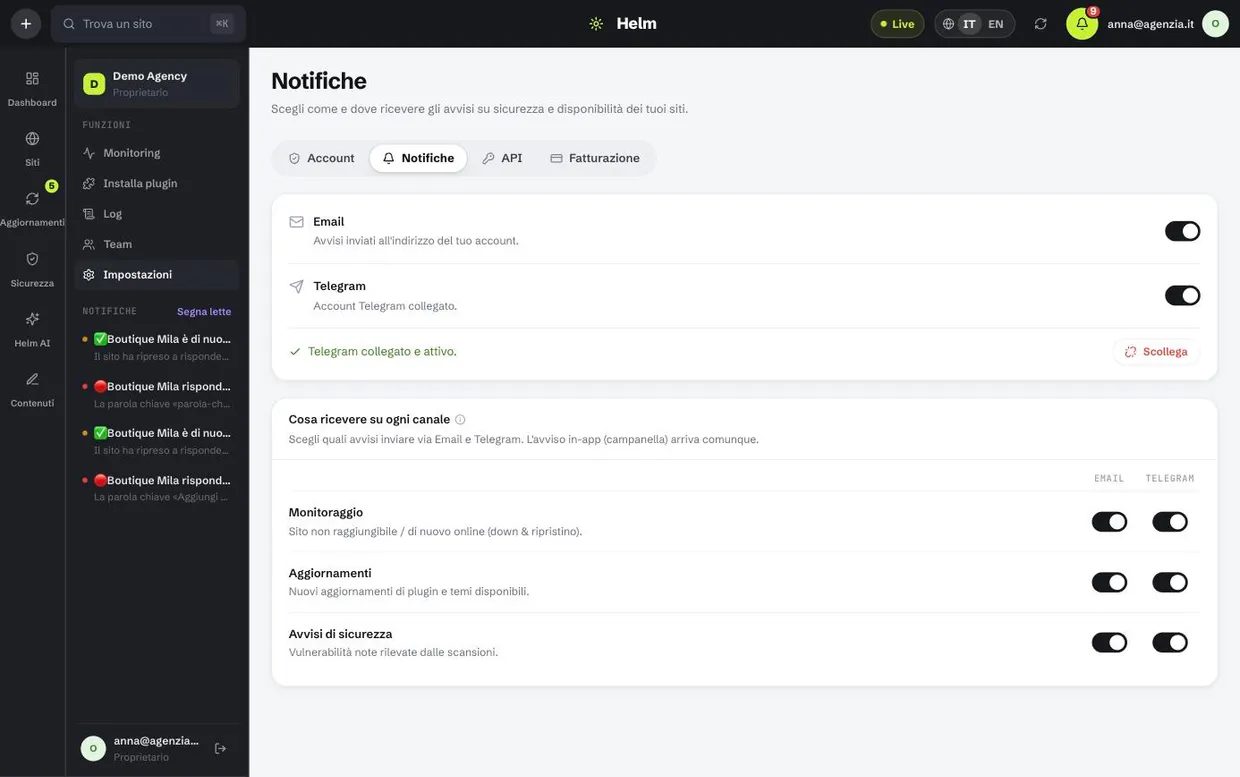
An alert is only useful if it arrives where you are looking. The bell in the panel always gets them, but if a site goes down at night something has to ring: that is why email and Telegram are chosen category by category, rather than all or nothing.
How to connect Telegram
- Open Settings → Notifications and turn on the Telegram switch.
- Follow the link that opens the conversation with the Helm bot and press “Start”.
- Back in the panel the state becomes “connected and active”. From there you choose which categories go to Telegram and which go by email.
What you can receive
- Monitoring — site unreachable and back online. These are the urgent ones, the ones worth sending to Telegram.
- Updates — new plugin and theme updates available. Fine by email, once a day.
- Security — known vulnerabilities found by the scans.
- Backups, content and billing — outcomes of scheduled backups, generated articles, plan renewals.
- An outage sends one alert, not one a minute, and a second one when the site comes back: if the phone rings twice, the story is over.
API and keys
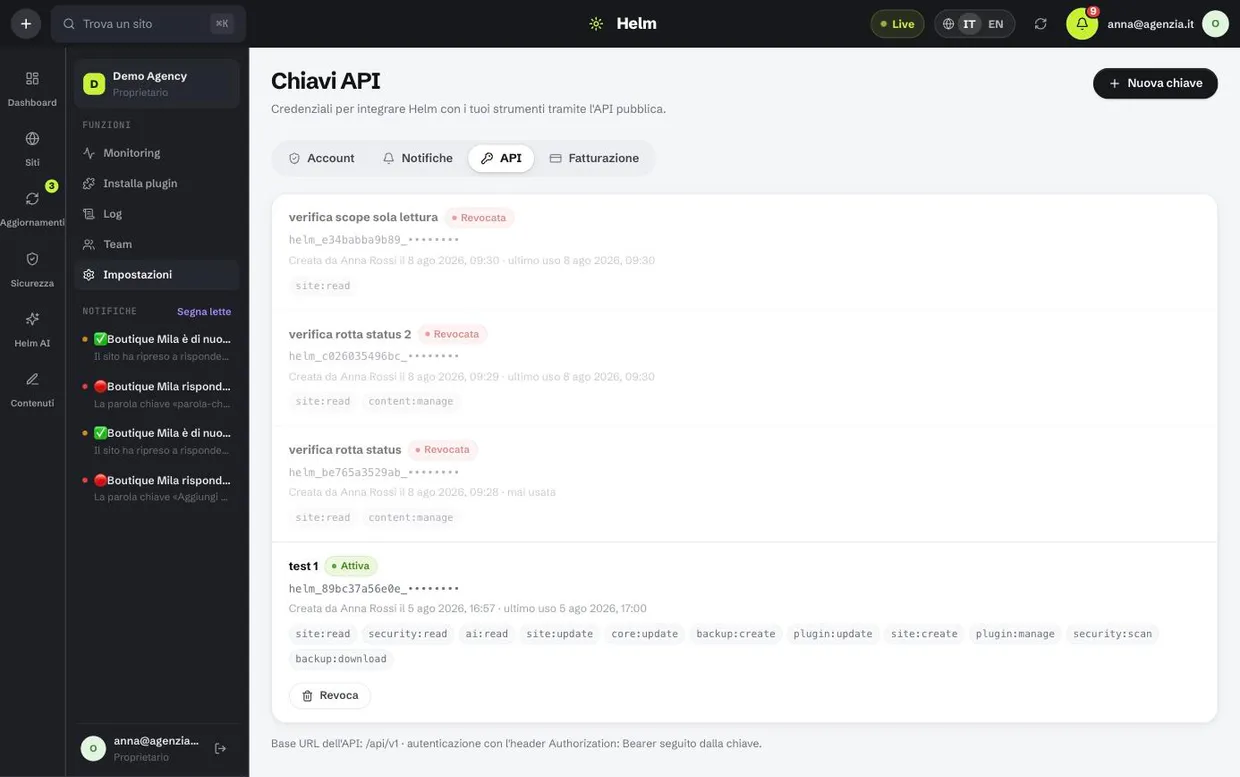
Everything the panel does can be done from code: list sites, apply updates, launch backups and scans, read availability, generate articles. It is for people who already have a dashboard of their own, or who want to wire Helm into tools they already use.
How to create a key
- Open Settings → API and press “New key”.
- Give it a name that says what it is for: in six months “test 1” will mean nothing.
- Choose the scopes one by one. Give only what is actually needed: a key that reads state does not need to be able to delete backups.
- Copy the key and store it straight away: it is shown in full exactly once and cannot be recovered afterwards.
- Use it in the Authorization header of your requests. Next to the key the panel tells you when it was last used.
Worth knowing
- Every key carries only the scopes you gave it, and you can review them at any time.
- There is a rate limit per key: it stops a misbehaving integration from hammering your clients' sites.
- A key can be revoked whenever you like, and stops working instantly from that moment.
- The full endpoint reference, with curl examples and responses, is in the API documentation.
Activity log
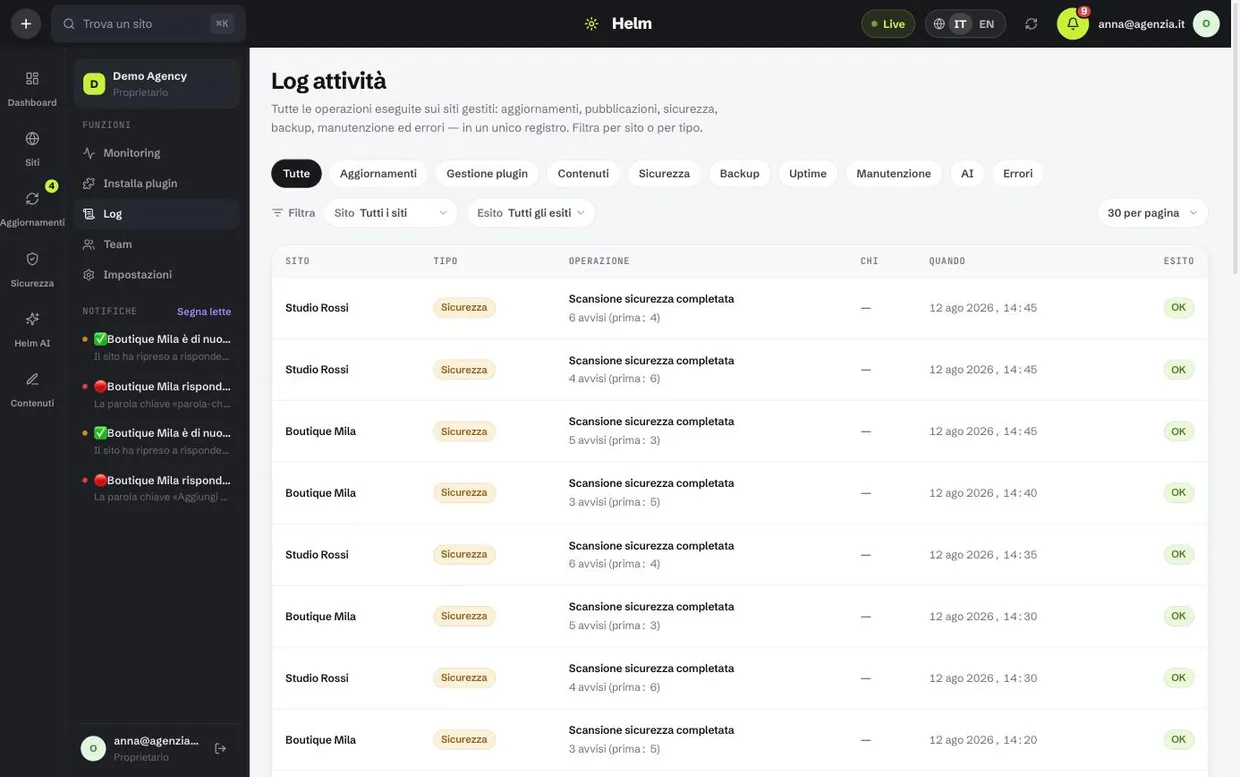
Who did what, when, and how it ended. Including changes made outside Helm — a plugin activated by hand in wp-admin, a version changed by someone else — which the periodic scan finds and records. It is the fleet's memory.
- Filters by operation type — updates, plugin management, content, security, backups, uptime, maintenance, AI, errors — and by individual site.
- Every row carries its outcome: succeeded, failed or with a warning. Failed rows contain the error returned by the site.
- Where an action was taken by a person, the log says who; where it was automated work, it says that just as plainly.
- It is the first place to look when something “did not happen”: it almost always did, and it failed with a precise message.
Account, plan and credits
Plan, credits, storage and sign-in security all live in Settings, across four tabs: Account, Notifications, API and Billing.
- The plan sets three numbers: how many sites you can connect, how many AI requests you get a month and how much backup storage you have. They are always visible, along with how much you have used.
- Included AI requests reset every month; credits bought in packs do not — they stay until you use them.
- Changing plan takes effect immediately and the site allowance adjusts: if you drop below the number of connected sites, Helm tells you which ones to remove first.
- Two-factor authentication is switched on from Settings → Account. Store the recovery codes somewhere that is not the computer you sign in from.
- The panel language is set here too, and it is independent from the language of the sites and of the generated articles.
When something goes wrong
The cases that actually happen, with the most likely cause and where to start. If the problem survives these checks, the activity log always holds the exact error returned by the site.
- The site says “Disconnected” but it opens in the browser — almost always the connector was deactivated during some work, or a host firewall is blocking outbound requests to Helm. Reactivate the plugin, then use “Check now” so you do not wait for the next round.
- An update failed — open the activity log and read the error returned by WordPress: nine times out of ten it is a PHP memory limit or a filesystem permission. If the site had stopped answering, Helm has already rolled plugins and themes back on its own.
- Visits show as zero — the count comes from a statistics plugin installed on the site (WP Statistics, for instance) and active for a few days: Helm reads its data, it does not collect traffic on its own. If the plugin was just installed, it needs a few days of data.
- Alerts are not arriving — check Settings → Notifications: that category may be off on exactly the channel you are watching. Remember the bell in the panel receives everything anyway, so if the alert is there, monitoring works and it is the channel that is off.
- Backups keep failing on the same site — usually out of space on the host, or a PHP memory limit too low to compress wp-content. Try “Database only” to find out whether it is the file part that cannot get through.
- Monitoring says down but the site opens — if you set a keyword, check that the text really appears on the page we check (the homepage), and not only on an inner page. It also happens that a site answers you well and us badly: in that case the technical error on the incident tells you which of the two it is.
- A client cannot see their site — check in Team that it has been assigned to them: with the Client role you only see the sites explicitly linked to that person.
- Broken links don't show up: the connector must be version 2.27 or newer — you update it from the site page — and the first pass runs within a day of connecting. «Check now» skips the wait.
- An alert says a backup is not restorable — that copy arrived incomplete or got corrupted in storage. The site itself is fine: run a manual backup from the Backup tab and check that the new copy passes the nightly check.
- An alert says an update made outside Helm broke the site — open the site page: the banner at the top lists what was updated in the last 48 hours, and «Roll back» returns those components to their previous version. If the site does not respond at all, first check with the host that it is up: the rollback goes through the connector, and on a dead site the connector died with it.
- The «Roll back» button is not there — this happens in three cases: more than 48 hours have passed since the update, the update was to the WordPress core (which cannot be rolled back), or the site no longer responds. In the last two the route is the same: restore the most recent backup from before the failure.
- A red bar says Helm's engine is stopped — it means the part that runs the work (checks, backups, scheduled updates, alerts) is not running, and the numbers you are reading are the last known state, not the current one. It is not a problem with your sites and there is nothing to do from the panel: write to us. The bar disappears on its own a few minutes after the service is back.
Ready to connect your first site?
The free plan includes five sites, forever, with no credit card.
Start for free